Install Sony Xperia Z1 Camera on Xperia Z, Z Ultra, ZL, ZR
Ok guys, we start to play around with some more interesting stuff. Getting root is fairly important and enjoyable to customize your android devices. This is one of the real and excellent example. Today, we are going to port the Xperia Z1 to Xperia Z practically and the port is also works to Xperia Z Ultra, Xperia ZL and Xperia ZR. Why do we port Xperia Z1 camera to other Xperia devices? Undoubtedly, Xperia Z1 camera has most updated software and features for Xperia Z1, the port helps you to enjoy the new camera features in other Xperia devices as well. Follow us to get the port now!
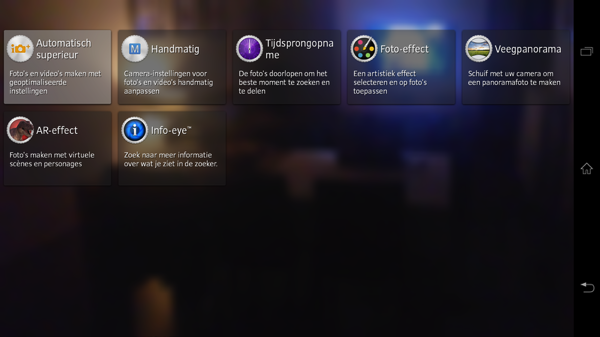
Thanks to efforts by XDA Recognized Developer krabappel2548 who bring the miracle to us, According to the developer, there are few new features you will be enjoying with this port. There are Info Eye, Augmented Reality effects, Timeshift mode, Manual Mode, Social Cast mode and automatic mode. Unfortunately, in order to port the Xperia Z1 camera, first of all, you need to have deodexed ROM, custom recovery and root on your Xperia device. We have ported the Xperia Z1 (Honami) camera on our Xperia Z device. It runs awesomely without major issue.
We foresee you may return with some issues during installation. Do not doubt to contact with us if you have any questions. We will give you full support to solve your problem.


How To Install Xperia Z1 Honami Camera On Xperia Z, Z Ultra, ZL and ZR
Disclaimer: It’s always a risk to modify your device. We, Android Teen are not responsible for any damage or bricks on your device. Your device warranty may void with any mod. Check your devices warranty’s term & conditions before start.(HTC,Samsung,LG, Sony, Motorola). Use this guide on your own risk, contact us for help if you face problem.
Pre-requisites & Requirements
- Xperia Z, Z Ultra, ZR, ZL with deodexed ROM, custom recovery and root (Ensure correct device model and firmware; Check device model – Go to Settings -> About Device -> Model Number)
- Windows-based computer or laptop
- Download Sony Xperia USB driver for Windows and install in your computer.
- Connect device to computer with USB cable to complete installation.
- Skip this step if you have installed the USB driver.
- Enable USB Debugging on your device. How to Enable USB Debugging Mode on Android Devices.
- Make sure your phone is charged to 60% 80% to avoid battery blackout and interruption during this tutorial.
- We recommend you make a backup on your data and media files before the tutorial. You may restore the data and files if necessary.
- How to Completely Backup Android Without Root
- How to Backup Personal Data on Android Device (Contact, Application Data, Wifi Password, APN Settings)
- Backup SMS and Restore on Android Devices
- How to Backup WhatsApp Messages
- (Complete back up for rooted Android Devices)
Reminder: Ensure you make a backup before proceed. Besides that, ensure you meet the requirements before proceed. Contact us if you face problem.
Download
- Xperia Z1 Camera for Xperia Z (Honami_Camera_XZ-XZL-v7.zip | 62.3 MB) – Source
- Xperia Z1 Camera for Xperia Z Ultra (Honami_Camera_XZU-v3.zip | 57.9 MB) – Source (Timeshift mode is not available yet)
- Xperia Z1 Camera for Xperia ZR and ZL (Honami_Camera_XZ-XZL-v7.zip | 62.3 MB) – Source
Instructions:
- Ensure you have meet all the requirements before start (Custom Recovery, Deodexed ROM and root).
- Download the Xperia Z1 camera zip and store in your device’s SD.
- Power off your device.
- Boot into custom recovery mode by pressing and hold Volume Up key and Power button.
- Navigate and select Recovery with Volume Up and Down button and use Power button to select.
- In the CWM Recovery menu, perform Wipe Cache Partition and select Yes to confirm.
- Back to Recovery menu, perform Wipe Dalvik Cache and select Yes to confirm.
- Back to Recovery menu, select install zip from sdcard, then select choose zip from internal sdcard.
- Select Honami_Camera_XXX.zip and click Yes to install.
- Back to recovery menu, select reboot system now.
- For TWRP custom recovery, goto Wipe and perform Wipe Dalvik Cache and Wipre Cache before flashing the ROM.
- Back to TWRP main menu, select Install and locate & select your downloaded flashable ROM zip (mako-4.3-rooted-signed.zip or mako-4.3-rooted-deodexed-signed.zip)
- Use Swipe to confirm flash button to flash the ROM.
- You should eventually see “Successful” after flashing.
- Press Reboot System.
- Once your device is rebooted, go to settings -> applications -> All applications tab.
- Tap on Camera and Camera Common.
- Force stop both application and Clear Data.
- Back to your device home, and use your camera app.
Drop us comment or highlight your problem to us. us or give us a if it works for you.


